Why physicists should use GitHub
posted: 2020-11-11 | last modified: 2026-06-18 | Tomohiro Soejima
Numerical calculation has become increasingly more important for physicists, whether you are a hardcore computational physicist who spend most of your time in the login shell of a supercomputer, or if you are more analytically minded theorist who uses numerics to prove a point. However, most physicists are not computer scientists by training, and we often fail to make the best use of existing machineries around programming.
One prominent example is the relatively slow introduction of GitHub, and version control system in general. This post explains why you should use GitHub, and also how to use git and GitHub.
Why version control system?
Problem statement
Merging mess
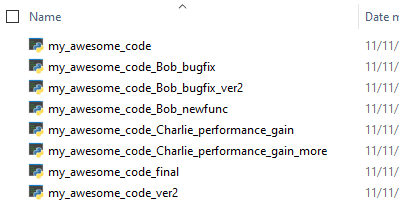
Let me first explain what kind of problem we are trying to solve. Let's imagine three scientists, Alice, Bob, and Charlie are working on a computational script. The script, my_awesome_code.py is in a good enough shape, but Alice has found a minor bug in the code, so she fixes it, and saves it in her local computer. However, Bob was working on the same script in the mean time, and he has added a new function to the script. He sends the code to Alice, and Alice saves it as my_awesome_code_Bob_newfunc.py. Charlie, on the other hand, has been working on speeding up the script, he sends his new version of the script to Alice, who renames it my_awesome_code_Charlie_performance_gain.py. Now, Alice needs to figure out which part has changed in Bob's script and Charlie's script, copy and paste the correct part, and update my_awesome_code.py. As you are almost done in the process, however, Bob says he has found a bug in a different part of the code, and he sends Alice a new version of the script, which she then needs to fix...
At the end of the day, Alice's directory looks something like this:
Dropbox to the rescue?
Alice concludes that the issue was lack of synchronization. The three of them were editing different scripts, and that is why Alice needed to the tedious merging procedure in order to reflect change that Bob and Charlie made. Fortunately, there is a technology for solving this problem! Many cloud storage services such as Dropbox offer near-simultaneous synching of remote folders. So Alice, Bob and Charlie sets up a shared Dropbox folder, and start editing the files there. Everything is working smoothly, and there's no need to tedious merging procedure.
That is until one day, Alice opens up her terminal as usual, and runs her my_awesome_code.py script as usual. However, this time around, the code crashes, emitting ominous-looking error messages. What went wrong? The code ran just fine last time Alice ran it. She concludes it must be a fix Bob or Charlie introduced, and quickly goes to check the file's history. To her horror, Bob and Charlie has introduced many changes to the code in her sleep (they are in different timezones), and Alice needs to track down which change caused the bug. Looks like Alice needs to spend another long day, hunting down all the code changes...
What went wrong?
What went wrong with these two scenarios? In the first scenario, as Alice correctly identified, the issue was the lack of any synchronization. However, the second scenario did not turn out particularly well either because there was perhaps too much synchronization. When synchronization is simultaneous, there's a room for collision of different changes, and it becomes hard to control which version of the code you are using.
We need to have the best of both worlds. We need to have some synchronization, so that Alice does not need to spend a day merging all the changes. On the other hand, we also need a better control over the state of the file than what simple cloud storage services provide. This is what version control system aims to provide. As it turns out the combination of git and GitHub is the most widely used version control ecosystem in the world, and we will focus our attention to these services next.
Lightining introduction to git
Your first commit
Here is a lightening introduction to syntax of git. I assume you have access to command-line interface to git. If you are Mac or Linux user, it is most likely installed on your computer. If you are using Windows, download Git for Windows.
Lauch your terminal (or Git Bash if you are on Windows). In order to check git is installed, run
$ git --versionIt should print the git version. Let's make a new directory somewhere and cd to it.
$ mkdir gittest
$ cd gittest
We make it into a git repository via git init command.
$ git initWhat does it mean for a folder to be a git repository? It means git has created a hidden folder named .git in the directory that stores version information among other things. You can check the presence of .git repository via lscommand.
$ ls -la

drwxr-xr-x 1 tomos 000000 0 Nov 11 01:04 ./
drwxr-xr-x 1 tomos 000000 0 Nov 11 01:04 ../
drwxr-xr-x 1 tomos 000000 0 Nov 11 01:04 .git/
Let's create some content in the directory. Using your favorite text editor, create README.md in the directory. Its content does not really matter. Once you do that, run
$ git status
On branch main

No commits yet

Untracked files:
  (use "git add <file>..." to include in what will be committed)
        README.md

nothing added to commit but untracked files present (use "git add" to track)
git status displays the status of the git directory. You see README.md appears as untracked. It means that git is aware of the existence of the file, but it is not tracking the file for the purpose of version control. In particular, untracked files will not be saved to version history when we perform git commit later on.
To tell git to include README.md to version history, run
$ git add README.md
$ git status
On branch main

No commits yet

Changes to be committed:
  (use "git rm --cached <file>..." to unstage)
        new file:   README.md
Now the file appears staged. This means that git is ready to save it to version history, but it has not yet done so. In order to save it to version history, you need to commit.
$ git commit -m "my first commit"
$ git log # prints a log

commit 9fc450ddec2egfff3127g95ef28d551f47924egff (HEAD -> master)
Author: Tomo Soejima <mymail@mydomain.edu>
Date:   Mon Jan 01 00:00:00 2020 -0800

    my first commit
As you see, now you have created your first commit.
Let's review some definitions.
A commit is a snapshot of the current state of the directory. It does not include untracked files.
An untracked file is a file that has been changed, but git will not save to the version history (i.e. commits).
A staged file is a file that's ready for a commit. When you execute
git commitnext time, the content of the staged file will be saved to the next commit.
So the workflow is
Change the content of the directory, by creating a new file, modifying an existing file, deleting a file, or any combination of these.
Stage the changes via
git add.Commit the change with a commit message via
commit -m "my commit message".Repeat.
This already distinguishes git from more familiar cloud storage services. While cloud storage services often provide automatic synchronization, you need to explicitly tell git via git commit command when you want the version history to be saved.
Power of branching
So far, we have only worked with completely linear version history. This might be okay if you are working on your own on a very simple project, but once you have multiple moving parts, a linear history will not cut it (think of poor Alice). To save you from such sorrow, git has a capability of branching. Think of a history consisting of multiple branches, each of which representing something different.
Let's create a new branch.
$ git branch new_branch
$ git branch # lists branches

* main
  new_branch
You see you now have two branches. Let's switch to the new branch, and create a file README_new.md with your favorite text editor.
$ git switch new_branch
$ touch README_new.md # create a new file
$ ls
README.md README_new.md
$ git add README_new.md
$ git commit -m "add README_new.md"
$ git log

commit 69a9b6692e03c9a808c0052659f84d587317c468d (HEAD -> new_branch)
Author: Tomo Soejima <tomohiro_soejima@berkeley.edu>
Date:   Mon Jan 01 00:00:00 2020 -0800


    add README_new.md

commit 9fc450ddec2egfff3127g95ef28d551f47924egff (master)
Author: Tomo Soejima <tomohiro_soejima@berkeley.edu>
Date:   Mon Jan 01 00:00:00 2020 -0800

    my first commit
Now, you can go back to the branch main, and check the content of that branch has not been changed.
$ git switch main
$ ls
You can even create a new file here.
$ touch README_main.md
$ git add README_main.md
$ git commit -m "add README_main.md"
$ ls
README.md README_main.md
Now the content of the branch main is not older than new_branch; it is completely different! They represent two very different versions of history.
In order to incorporate the content of new_branch into main, you run merge.
$ git status # make sure you are on main
$ git merge new_branch
$ ls
README.md README_main.md README_new.md
Hooray, you have successfully merged the content of two diversing versions of history, just with a line of command.
Let's recap
A branch is a label for particular commit. You are (almost) always on a particular branch. The label moves to a new commit whenever you create a new commit.
switchcommand can be used to move from one branch to another.mergeis used to incorporate the content of one branch to another.
Further reading
The concept around commits and branches are rather confusing to the beginners, especially because the terminology is not very straightforward. I've also simplified some aspects drastically for explanation. Here are a couple of references to help you get used to git maneuvers.
Learn git branching is an interactive WebUI that teaches you how various git commands work.
Pro git book, is a self-contained guide to git.
Moreover, many of you may find more graphical approach to using Git more intuitive. Here are a couple of recommendations
GitHub Desktop offers a simple GUI for managing your git and github repositories.
Similarly, Sourcetree and GitKraken are great free GUI's for git. I personally prefer GitKraken since it works on Linux.
Various text editors and IDE's also support GUI-like capabilities. I recommend you check out Visual Studio Code (this is how I use git most of these days).
Going online: GitHub
In the previous section, we looked at how to make a git repository on your computer. However, in order to share your work, you should use a so-called remote repository. GitHub is a cloud service for remote repositories.
Creating your first GitHub repo
After creating a GitHub account, create a repository following the instruction here. You can ignore steps 2 through 6, since we have already done that.
After that, you can navigate to your_remote_repository_url, and you should see the content of your repository on GitHub.
Creating a pull request
A major part of using GitHub is creating Pull Requests. A pull request is a request to merge the content of one branch to another branch. In order to help with this, GitHub comes with a nice graphical interface for reviewing the changes that come with the merge. (The name is a bit misleading. It may be more accurately described as a merge request.)
Let's get back to the command line, and change the content of new_branch branch.
$ git switch new_branch
$ vim README.md # use your favorite text editor
$ cat README.md # print the content
Test for Pull Request
(The content of the file does not really matter)
$ git add README.md
$ git commit -m "update README.md"
$ git push origin new_branch
Let's move to your remote repository URL. Navigate to the pull request tab. You should see a button for "new pull request". Once you click the button, it will show something like
base: master <- compare:masterChange this to
base: master <- compare:new_branchYou can now create a pull request. Once a pull request has been created, it receives a dedicated url (it should look something like github.com/your_user_name/your_repository/pull/1), and you can comment on your pull request. There's not much to do though, so just click "merge pull request" and "confirm and merge". Now, if you navigate again to the main page of your repository, you should see your README.md has been updated to include the content from new_branch branch.
As is, this does not look particularly useful. Why do you need to go through such hoops and create a pull request? The full power of pull requests becomes apparent once you start collaborating with other people. Suppose Charlie wanted to improve performance of my_awesome_code.py. With the help of GitHub, he can work on this in a new branch, and implement his changes within that branch. Once he is done with it, he can create a pull request, and then Alice can review the pull request to decide whether to accept the changes or not. Until she approves the pull request, the code in the main branch does not change, insulating it from any bugs that may have been introduced by Charlie's half-clever performance improvements.
To recap:
A remote repository is a URL used to store your git repository in the cloud.
A pull request is a request to merge a branch to another branch. It comes with a nice browser interface.
Pull request allows changes to be implemented without affecting the production code.
Further reading
I only scratched the surface of how to use GitHub.
There are certain "git branching models" people use to keep track of projects. As a starter, GitHub flow is probably the most straightforward one to use.
GitHub Guides seem to contain a set of very useful guides for beginners of GitHub.
You can find other online resources for your specific need. Most likely someone has alread asked (and answered) your question before!
Summary
Git and GitHub are great tools that help you collaborate with other scientists more easily. Even though the initial learning curve is rather steep, once you get used to them, these tools make collaboration a lot easier and a lot less painful. I hope this article helped lessen the activation barrier for learning GitHub a bit, and I hope you enjoy a productive coding life!